Protect Frodo
Remember that the Companions in the Fellowship are there to protect Frodo. Let them do just that! Do not hesitate to sacrifice them to keep the Corruption level low and the Fellowship moving. The exception to this is - of course - Strider, who you want to separate and move to Gondor where he can be recognized as the rightful heir to Isildur.Stay Hidden
Always hide the Fellowship as soon as possible: The Shadow player has some nasty Character Event Cards that he can use to hit the Fellowship with once it is revealed. Strider’s ability to hide the Fellowship with any Action die comes in handy here. If the Fellowship is revealed at the end of a game turn, it is usually a very good move to make Strider the Guide during the Fellowship phase at the beginning of the next turn, to be able to use his ability to hide the Fellowship as your very first action in that turn.Keep Moving
As the armies of the Shadow are conquering the Settlements of the Free Peoples of Middle-earth, in their attempt to emerge triumphant in the War of the Ring, you might say that speed is of the essence. Try to move the Fellowship as often as you can. HOW often will depend on the number of Character results you roll on your Action Dice, and how many Eye dice the Shadow player has in the Hunt box. When three or less Eye dice are in the Hunt box, try to move twice if you can. If there are only one or two dice, use an Elven ring (if possible) to hasten the movement of the Fellowship. Another factor is how many Hunt re-rolls the Shadow player has managed to get; moving Nazgûl to the region with the Fellowship is easy; moving an Army unit there is not as easy. Consult the following table to see the odds the Shadow has of successfully rolling for the Hunt.First Movement - Six or more to hit
| Amount of Dice allocated for the Hunt | 1 | 2 | 3 | 4 | 5 | |
|---|---|---|---|---|---|---|
| Re-Rolls | 0 | 17% | 31% | 42% | 52% | 60% |
| 1 | 31% | 42% | 52% | 60% | 67% | |
| 2 | N/A | 52% | 60% | 67% | 72% | |
| 3 | N/A | N/A | 67% | 72% | 77% | |
Second Movement - Five or more to hit
| Amount of Dice allocated for the Hunt | 1 | 2 | 3 | 4 | 5 | |
|---|---|---|---|---|---|---|
| Re-Rolls | 0 | 33% | 56% | 70% | 80% | 87% |
| 1 | 56% | 70% | 80% | 87% | 91% | |
| 2 | N/A | 80% | 87% | 91% | 94% | |
| 3 | N/A | N/A | 91% | 94% | 96% | |
Third Movement - Four or more to hit
| Amount of Dice allocated for the Hunt | 1 | 2 | 3 | 4 | 5 | |
|---|---|---|---|---|---|---|
| Re-Rolls | 0 | 50% | 75% | 88% | 94% | 97% |
| 1 | 75% | 88% | 94% | 97% | 98% | |
| 2 | N/A | 94% | 97% | 98% | 99% | |
| 3 | N/A | N/A | 98% | 99% | 99% | |
Fourth Movement - Three or more to hit
| Amount of Dice allocated for the Hunt | 1 | 2 | 3 | 4 | 5 | |
|---|---|---|---|---|---|---|
| Re-Rolls | 0 | 67% | 89% | 96% | 99% | 99% |
| 1 | 89% | 99% | 99% | 99% | 99% | |
| 2 | N/A | 99% | 99% | 99% | 99% | |
| 3 | N/A | N/A | 99% | 99% | 99% | |
Fifth Movement - Two or more to hit
| Amount of Dice allocated for the Hunt | 1 | 2 | 3 | 4 | 5 | |
|---|---|---|---|---|---|---|
| Re-Rolls | 0 | 83% | 97% | 99% | 99% | 99% |
| 1 | 97% | 99% | 99% | 99% | 99% | |
| 2 | N/A | 99% | 99% | 99% | 99% | |
| 3 | N/A | N/A | 99% | 99% | 99% | |
Decisions, Decisions, and more Decisions
If you concentrate too much on the politics and the Armies of the Free Peoples, the result will be a slow or non-moving Fellowship. However, there is also an issue if the Fellowship is moving too much, as it is not only speed, but also secrecy that matters. Moving the Fellowship more than once per turn when there are more than three Hunt dice in the Hunt box might prove a grave mistake. The biggest threat to your Fellowship are the Corruption points you suffer, as you can only heal them one per turn when resting in a Free Peoples’ City or Stronghold (which must be still in your control). As we are on the subject of Corruption points, let us take a closer look at how to manage them. The first rule you must learn is that it takes longer for you to heal them than it takes for your opponent to force them on you. Try to use your Companions as shields as often as it seems prudent: When faced with a “2” or a “3” tile it might be wise to sacrifice the Guide, as long as it isn’t Strider, or to take a random casualty - but don’t sacrifice a randomly selected Companion as a casualty when your opponent draws a “1” tile. The second rule is to plan ahead. Where can Frodo rest and heal to reduce those Corruption points he already suffered? Depending on the route you take (more about routes soon!) you will have at least one Free Peoples’ City or Stronghold to rest in, unless the Shadow captures it before you get there. If you want to survive the trek across the plains of Gorgoroth, Frodo cannot have sustained too much Corruption on the way. If Corruption is high, you should consider healing somewhere along the way. Reducing Corruption takes time, but there is no point in rushing towards certain death on the slopes of Mount Doom. Deciding on if, and for how long, you should heal can be a difficult decision indeed. You must take many variables into consideration. How many Victory points has the Shadow accumulated? How long will it take for him to reach ten Victory points, and win the game? How much more Corruption will Frodo suffer before reaching Mordor? Which Hunt tiles are left in the Hunt Pool and which special tiles are in play? All these things must be closely paid attention to when deciding on for how long the Fellowship can stay and heal.Plotting the Route
There are four viable routes for the Fellowship in order to reach Mordor, let us examine them.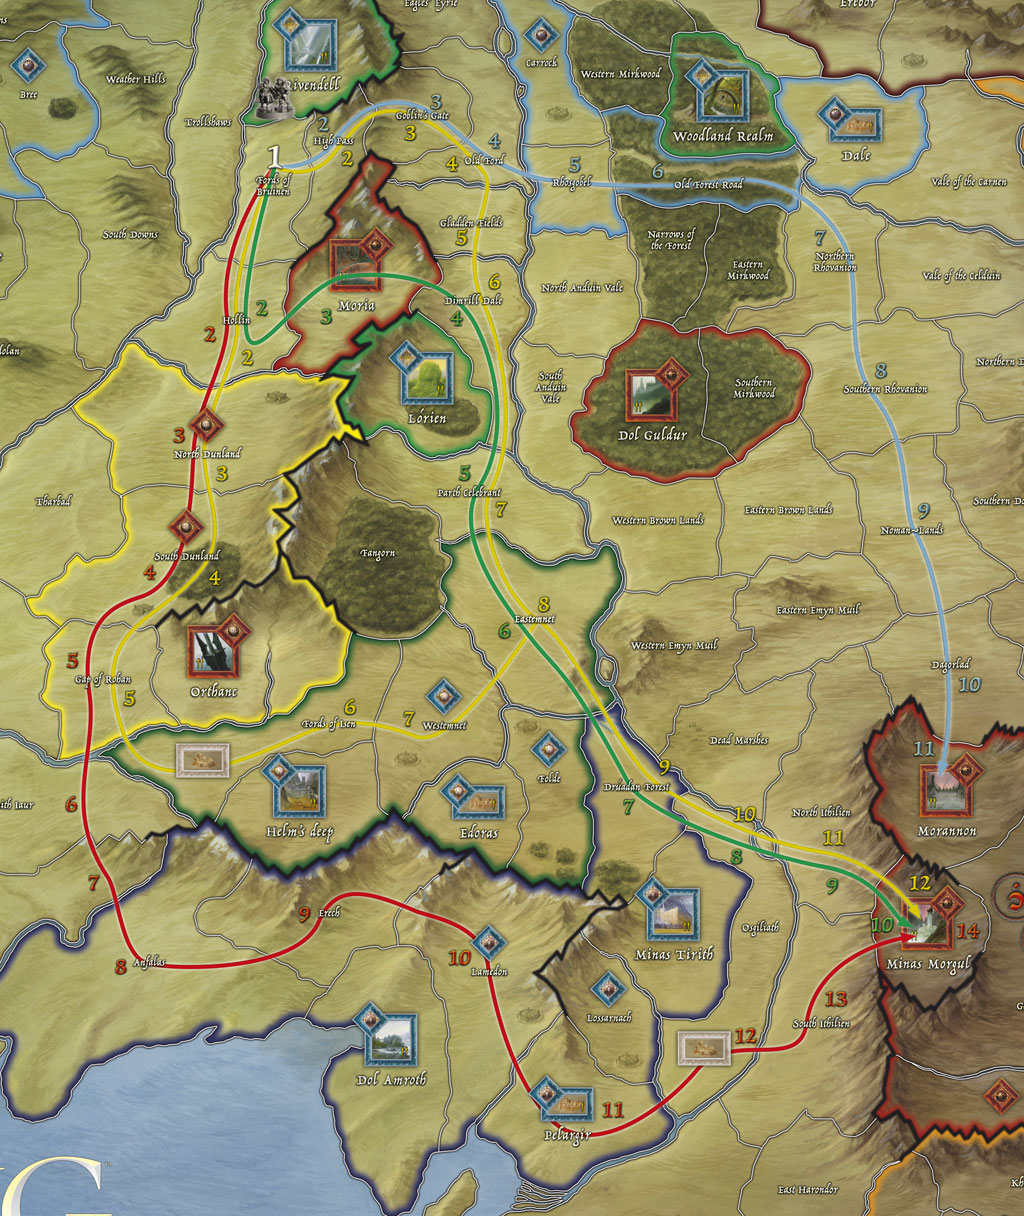
The Routes - Click to Zoom


Follow Us on