Planning and Movement
Sailing an Age of Sail warship is not like driving a sportscar! When playing with the Basic Rules, each ship's Captain selected a maneuver card and played it immediately, driving their ship through the waves. Furthermore, the ship's Captain was able to select any maneuver card in the deck, making quick turns and changes of direction. The aim of the Standard Rules is to keep the same simple movement system but make the movement system feel more like sailing a large ship. Therefore, in the Standard Rules, each turn the player selects the maneuver card the ship will use on the next turn, and then the ship movement is dictated by the maneuver that was selected in the previous turn.Plan the Move
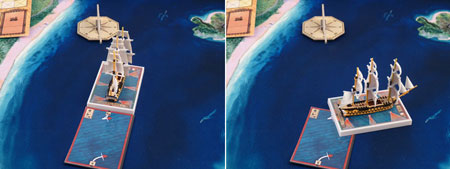
During the first Planning phase of the game, the ship's Captain selects two maneuver cards from the deck, and place them face down on the Ship Log, with the first on the left and the second on the right. The ship's Captain will then play the first maneuver card during the Movement phase. During the second and all subsequent Planning phases, the ship's Captain moves the face down maneuver card on the Ship Log to the left, and selects and plays a new maneuver card, face down, on the Ship Log to the right. The ship's Captain will then play the first maneuver card during the Movement phase. This one-turn delay in the vessel’s movement will give the players more of an accurate feel of sailing a ship, while not bogging down play.
1- One maneuver card is planned from the previous turn. 2- You plan a second maneuver, and place it in the second space of the ship log. 3- The card planned in the previous turn is revealed.

4- The current maneuver card is placed. 5- The current maneuver card is executed. 6- The second maneuver card becomes the first, to be executed next turn.

If, when you reveal a maneuver, the ship is taken aback, replace the card with a red card of the same orientation.
Move the Ship
Before moving the ship (with the card selected the previous turn) the ship's Captain still determines the attitude of the wind to the ship, in the same way as in the basic rules (see our previous article). However, because the maneuver card was planned in the previous turn, the situation might be different from what you expected – It is not easy to assess the future attitude of a ship unless you are an experienced captain! If, when determining the attitude of the wind to the ship, the ship's Captain finds that the ship has been taken aback (sailing against the wind) then the ship's Captain replaces the normal maneuver card with a red border maneuver card. Replace a right turn maneuver card with a red-border right turn card; a left-turn maneuver card with a red-border left turn card; and a straight maneuver card with a red-border straight.
A red border maneuver card is used when the ship is taken aback. In the first turn that this happens, use the arrow with one sandglass.
Veer
The other change to the maneuver rules takes into account the different maneuvering capability of different ships. Each ship has, on its Ship Log, a Maneuverability rating – indicated by the number next to the ship’s wheel symbol at the top left of the Ship Log. Each maneuver card also has a maneuverability value, again noted by a number next to the ship’s wheel symbol at the top left of the maneuver card. During the Planning phase, the ship's Captain may not select a maneuver card whose maneuverability value is different (higher or lower) from the previous maneuver card by more than the ship’s Maneuverability rating. For example, the Concorde has a Maneuverability rating of 7. If the last planned maneuver card for Concorde has a maneuver value of 2, the Captain of the Concorde can select any maneuver card with a maneuver value from 0 (the lowest in the deck) to 9. The Captain of the Concorde may not select a maneuver card with a maneuver value of higher than 9, because the difference between the prior maneuver card’s maneuverability value (2) and the selected card’s maneuverability value (more than 9) would exceed Concorde’s Maneuverability rating. In order to keep the game moving, if a ship's Captain mistakenly plans an illegal maneuver card, that card is replaced with a straight maneuver card (with a value of 5) when it is revealed. Sometimes the crew doesn’t carry out a Captain’s orders as he might have wished!Combat

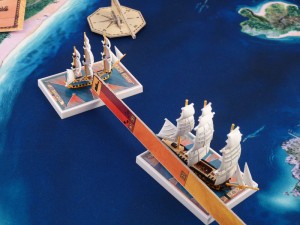
1. The Commerce de Bordeaux is hit across the front side of her base by a raking broadside from HMS Cleopatra.
Raking
During the Age of Sail, Captains spent a lot of time and skill maneuvering for a raking shot – a shot that travels down the length of an enemy ship, rather than taking it in the more protected side. During the Combat phase, when a ship fires on another ship, place the target ruler on the central firing cone on the shooting side of the firing ship, and measure to the main mast of the targeted ship. If the ruler passes through the short side of the target base (either the front one or the rear one), it’s a raking shot, and the broadside will sweep the deck of the target ship along its full length, dealing out additional damage. If the ruler goes across the front side, the target takes one more damage token every three (rounding up) that it should take. Since the stern is the most fragile part of the ship, if the ruler crosses the rear side of the base, the target takes one more damage token every two (rounding up) that it should take. Example: The Commerce de Bordeaux is hit across the front side of her base by a raking broadside from HMS Cleopatra. The Cleopatra has currently a firepower of 3. If the raking fire comes from the front, the Commerce de Bordeaux draws 4 tokens instead of 3 (one third of 3 is 1 additional token). If the raking fire comes from the rear, the Commerce draws 5 tokens (half of 3 rounds up to 2 additional tokens).Ammunition
In the Standard Rules, during the preparation before the start of the game and each time the guns of a side are loaded, a ship’s Captain may select different types of ammunition to load. Sails of Glory uses three different types of ammunition: ball, chain and grapeshot. The choice of ammunition is made secretly. The ship’s Captain, during the Reloading phase, indicates that a broadside is loaded and ready to fire by placing a face down counter with the chosen ammunition type in the appropriate spaces on the ship log, one for either broadside. Each kind of ammunition has a different effect and use:- Ball is the “common” ammunition. Ball has a longer range and causes more damage to the target ship’s hull than to its crew or sails.
- Chain is a special ammunition consisting of balls linked by a chain, which spins when fired. Chain has a shorter range than ball, and is used to wreak damage across the deck, masts, and sails of the target ship, to decrease her maneuverability and speed. This kind of ammunition is especially useful when playing with the advanced rules.
- Grapeshot is a mass of small balls and pieces of metal that scatter to inflict more damage to the crew than to the ship hull. It also has a shorter range than ball, and causes less damage to the ship’s hull.


Follow Us on