Captain Richard Bowen felt HMS Terpsichore heel over hard as his orders to pack on sail were swiftly carried out by his crack crew. The sail his watch had spotted earlier was closing fast – it was a Spanish Frigate, about the same size and weight as Terpsichore, and it looked to be moving into a fighting position, with its hopes of running into Cartagena dwindling. As the Spaniard hove about, Bowen called “Give her one gun, and let’s see her intentions.” A single cannon shot rang out, and the ball skipped across the water in front of the Spanish Frigate Mahonessa. Seconds later, the Spaniard’s side erupted in flame and smoke as she emptied an entire broadside toward Terpsichore. “She let that one go a bit early, bear down and let’s give her a full dose!” cried Bowen, and he felt the ship angle toward the Spaniard, as he heard his Starboard guns run out to be fired.
The capture of Mahonessa by HMS Terpsichore was a classic running gun battle between evenly matched ships. The fight went on for an hour and forty minutes, as the two captains maneuvered for position and exchanged broadsides. Sails of Glory allows you to recreate exciting engagements like this one, and with a speed of play that keeps the engagement thrilling.
As we discussed in the previous article, the game turn in Sails of Glory is composed of four phases: Planning, Movement, Combat and Reloading. Players perform each of these phases simultaneously with each other player, increasing the pace of the game. In the previous article, we discussed the first two phases – Planning and Movement – in the Basic Game. In this article, we will explain the last two phases - Combat and Reloading.
Combat
1 Once each player has completed its maneuver for the turn, the players will check to see if there are any possible targets for Artillery Fire.
- On the side of each ship base are three black dots, and emanating from each dot is a red angle, which opens outward. The center dot, with its resultant angle, represents the angle of fire for that full broadside. The forward dot, with its angle, represents the angle of fire for the forward ("stem") broadside, and the rear dot the angle of fire for the rear ("stern") broadside.
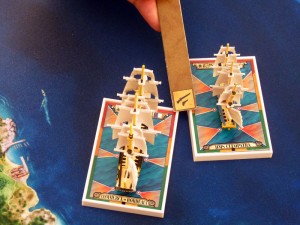
- To determine whether his ship has an available target, the player simply takes the firing ruler, places its’ end on the full broadside dot on either side of his ship, and moves the ruler across the angle of fire. If the rule touches the base of any enemy ship, that ship is a potential target for a full broadside.
- The player can repeat the check with the forward and rear broadsides, and with both sides of his ship – giving him up to 6 possible firing arcs.

To determine available targets, the player can check the possible firing arcs of his ship. From left to right: full broadside, forward broadside and rear broadside.
2 If a player has a target, he must then determine which, if any, ships he will fire on.
- The player may fire only if that side of his ship is Loaded. If he fired that broadside last turn, it will be Unloaded until he takes a turn to Reload.
- The player is never required to fire, even if he has a target and the broadside is loaded – he may wait for a better shot.
- The player may fire at only one ship per broadside on any turn. If the player has multiple targets available, he must choose one per side. This is so even if the targets can be hit by different firing arcs (Full, Forward and Rear) from the same broadside – the player must choose one arc and one target for that turn, per side.
- Note that if both sides are loaded and both sides have targets, both sides may be fired.
- Firing empties the Broadside, regardless of which arc is fired.
3 Once a player has decided on a Target, he will determine the power of the shot. This depends on the firing ship, the damage the firing ship has taken, and the angle of fire and the range to the target.
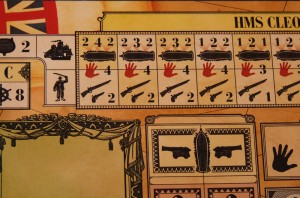
- The base firepower of the firing ship is shown on the top row of the vessel damage track on the Ship’s Log.
- As your ship takes damage from enemy shots, damage tokens will be placed on this damage track, and over time will reduce the ship’s firepower.
- The firepower on the Ship’s Log in each box has three numbers – the center number for the Full Broadside, the number on the left for the Forward Broadside, and the number on the right for the Rear Broadside. The lower Forward and Rear numbers reflect the fact that not all of the cannons of that Broadside can be brought to bear on the target that turn.
- The firepower numbers determines the number of Damage Tokens that will be drawn against the targeted ship. The range determines the force of those hits. If the target is reached by the first half of the ruler, the attack is at short range and the targeted player draws the firepower number of stronger “B” damage tokens. If the target is only reached by the second half of the ruler, the attack is at long range the weaker “A” damage tokens are drawn.
- The target draws the appropriate number and kind of damage tokens immediately, but does not apply the damage to his ship until all combat for all ships for the turn is resolved. All fire is considered simultaneous.
- After firing, that Broadside is Unloaded and must be Reloaded before it can be fired again.

If the target is reached by the first half of the firing ruler, the attack is short range, with stronger damage. If it's reached by the second half of the ruler, the attack is long range and weaker.
4 Players may also determine whether they have possible targets for Musket Fire.
- Muskets may be fired at any ship that is within the width of the target ruler.
- Only one ship may be targeted per turn.
- The musketry firepower is the number beside the rifle symbol on the second row (the crew losses boxes) on the firing ship log.
- The attacker uses the number in the leftmost empty box to determine firepower. The target takes that number of “E” damage tokens.
- Muskets may be fired regardless of whether one or both broadsides were also fired that turn.
- Musket fire is always available – there is no reloading requirement.
5 Applying Damage
- After all artillery and musket fire is resolved and all damage for that turn is determined, the damage tokens are placed on the ship logs.
- All damages are attributed at the same time, so that attacks always use the values that ships had at the start of the turn.
- Damage tokens show numbers or symbols. The Number indicates damage to the vessel. The Crew Loss symbol indicates injuries to the crew. In the Basic Game, other symbols are ignored.
- Numbered tokens are placed on the damage to the vessel boxes on the first row, starting from the leftmost box. In each box you can place more than one token, until the sum of their values matches or exceeds the Burden value of the ship.
- Crew loss tokens are placed the second row, starting from the leftmost box.
- If, at any time, all the boxes of either row are covered, the ship surrenders and is removed from the gaming field.

The target ship has a Burden of 5: the first two tokens will fill the first damage box, the other ones will go in the second box.
Reloading
In Sails of Glory, when the battle has begun, it’s not possible to fire a broadside every turn. When a ship fires a broadside, a player uses its ammunition. That side will not be able to shoot again until the guns are reloaded, at the end of the next turn - a player may reload only a broadside that did not fire that turn.
Once reloaded, the broadside may fire again normally next turn.Example: HMS Defence cuts the French line, sailing between Mucius and Tourville. Defence began the scenario with both broadsides loaded, and has not yet fired. This turn, Defence may fire a Broadside at both Mucius (from the port side) and Tourville (from the starboard side). Next turn, if the ships remained in the same relative positions, Defence could not fire at either French ship – both of Defence ’s broadsides are Unloaded. Defence can choose to reload, but can't fire.
In the next article, we will see how the standard rules add more detail and realism to the basic game.
See also:
Sails of Glory Preview - Part 1: Introduction
Sails of Glory Preview - Part 2: Unfurl the Sails!
Sails of Glory Preview - Part 4: The Standard Rules


Follow Us on